You are on eastlansinginfo.org, ELi's old domain, which is now an archive of news (as of early April, 2020). If you are looking for the latest news, go to eastlansinginfo.news and update your bookmarks accordingly!
You are on eastlansinginfo.org, ELi's old domain, which is now an archive of news (as of early April, 2020). If you are looking for the latest news, go to eastlansinginfo.news and update your bookmarks accordingly!

The summer is an excellent time to bud-graft fruit trees. The process of bud-grafting is similar to regular grafting covered earlier by ELi, but rather than using a whole stem as is done in traditional grafting, only a new bud is grafted onto the rootstock.
Bud-grafting takes very little effort and can be done quickly, which makes it a popular way to put one variety of fruit tree on a hardier rootstock. It also seems to work particularly well for fruit trees.
Regular grafting is done in very early spring when the scion (i.e., the donor) branches and the rootstock are dormant. Bud-grafting does not work then, because the new buds are not adequately developed and the buds do not easily slip off of the wood beneath them.
But in summer, new buds are easy to slip off the wood beneath. The process of bud-grafting in summer is simple, straightforward, and takes only a sharp knife, the trees, and some tape.
First, make sure the sources of the bud and the rootstock are healthy and well watered. (The watering part is not a problem this year.)
Find a branch that has a healthy bud at the base of a leaf. Cut the branch off the tree.
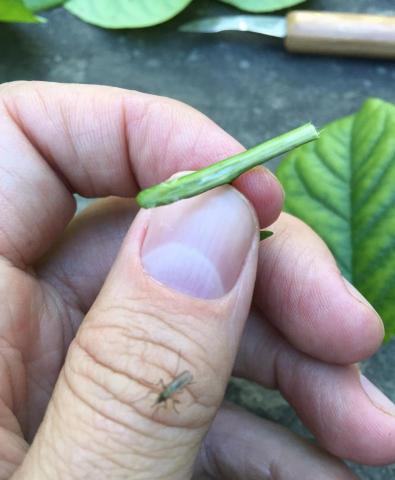
Then use a sharp knife to cut the area including the bud off the branch. The idea is to peel the branch under the bud down the center lengthwise so that you have a one-inch exposed section of stem lengthwise with the leaf's base and the bud in the middle. This photo shows a bud (red arrow pointing to it) growing between the stem and the leaf base. The stem below the bud has been cut away from the rest along about a one-inch lengthwise section.

Here’s a video that shows how you make this cut.
What you now have is the donor graft. The photo below shows the raw cut-away side of our graft. (You can tell by the mosquito that this is an authentic photo of this year’s growth.) The white woody layer inside the stem came right off the graft and left only the green wood, the cambium layer, which is what we want.
To prepare the rootstock, make a T-shaped cut in the rootstock plant’s bark where you want the graft to go. You are making a T-shaped cut because you’re going to peel back the bark (from the inside corners of the T down and sideways) to expose the cambium layer.
The cut needs to get down far enough to expose the cambium layer of the rootstock. Both traditional and bud grafting work by connecting the cambium layer of the donor/scion with the cambium layer of the rootstock. (The picture below shows the cut in the rootstock with the bark peeled back slightly.)

While you work on the rootstock, the bud graft needs to stay moist. You can put it in some water, or you can work very quickly to get away from the mosquitoes, or you can put it in your mouth like I did.
Once the rootstock is ready for the graft, slip the bud graft into the T-shaped cut in the rootstock as you see in the picture below. Make you have the bud right side up (pointing the same way up as on the original branch) or it will die. Take it from me.
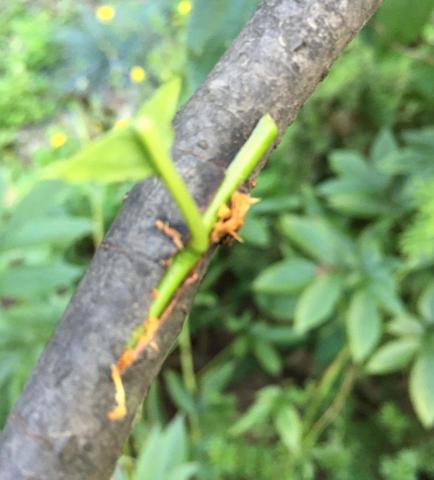
Finally, trim off any excess bud and tape the graft closed to keep moisture in and bugs and disease out. As you can see in the picture below, I used electrical tape like my grandfather did, but non-adhesive grafting tape is almost certainly better for the bark. With non-adhesive tape, you can cover the whole bud until the graft heals over in a few weeks.

In a few weeks, the bark should seal around the bud, which should continue to look healthy like it did when you grafted it. Any remainder of leaf will probably die off, but next spring the bud will, hopefully, sprout out in a new branch on your rootstock. For the optimistic gardener of East Lansing, fruit will grow off your bud in 2-3 years.
Remember, in gardening, if you aren’t killing something, you probably aren’t stretching yourself as a gardener.
eastlansinginfo.org © 2013-2020 East Lansing Info